RPi DJ
Music Control System
By Jacob Tamor (jwt95) and Rosie Wildermuth (rjw252)
Demonstration Video
Introduction
Music is one of the most common forms of media consumed by college students, whether it is listening while we are studying or while hanging out with friends. As our final project for this course, we wanted to approach the idea of a customizable music system that functioned similar to that of a DJ. This customizable DJ system allows for the user to increase and decrease the volume, bass, mid, and treble of a song actively while it is playing. These adjustments are instantaneous and can be heard clearly in the audio playback of the song. The user of our system is given eight song options to choose from at the beginning of the program, and can choose a different song to play by simply hitting the back button on the screen. Through our graphical user interface, the user can be their own DJ on the Raspberry Pi.
Project Objective:
- Synthesize clear audio playback through a DAC from the Raspberry Pi.
- Design an intuitive user interface to display on the piTFT.
- Implement a data transfer method between the two programs to signal one another.
- Control audio playback using the user interface and hear the audio adjust in real time.
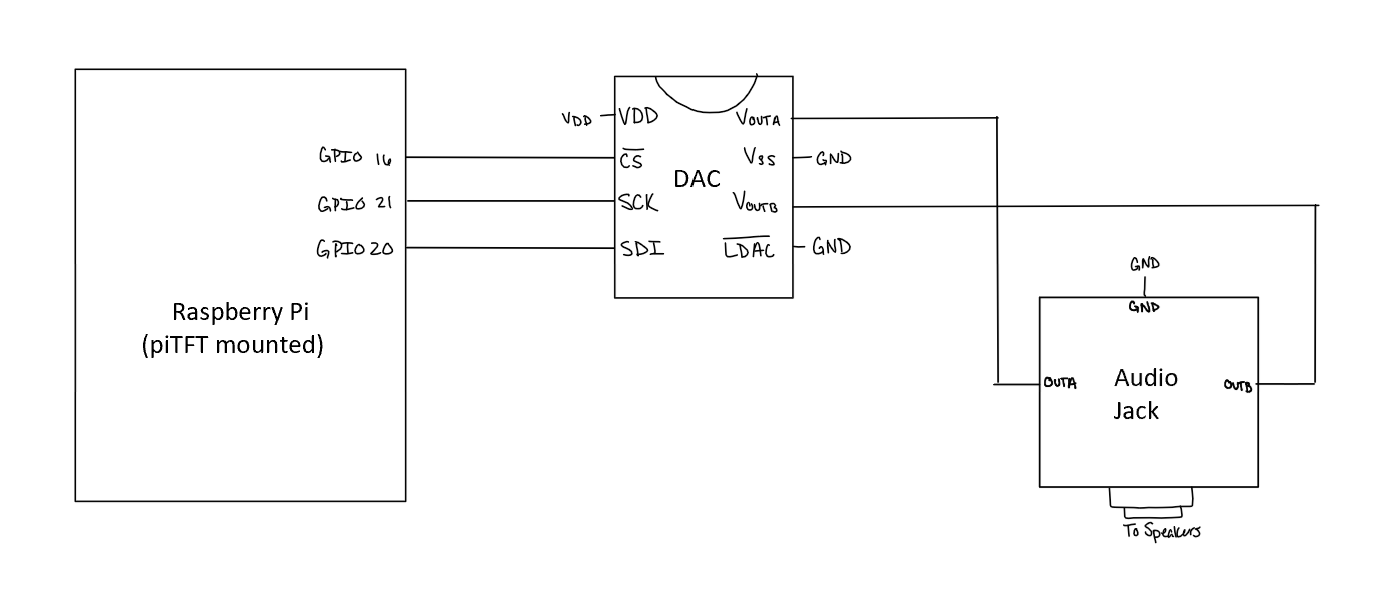
Circuit Schematic
Design and Testing
Audio Preprocessing
Based on the specifications of the DAC used, a 16-bit message is needed as the DAC input, but with the first 4-bits as configuration bits and the remaining bits as the message desired. Since the Python wave module, which is used for reading the information from the audio files, stores its information in bytes, the bytes must be manipulated into a format that agrees with the configuration format. Thus, each frame taken from the audio file is right-shifted by four bits and then has its first four bits replaced by 0011, the bits required to configure the DAC.
Because the ultimate goal of this project is to manipulate the audio to hear different frequency ranges at different volumes, much of the audio processing occurs in the frequency domain. The .wav files, however, that are loaded into the Python program, hold their information in the time domain, thus requiring us to apply a Fourier transform to the audio file to extract its frequency spectrum. This was accomplished by splitting up the song into chunks of time and running an FFT (using functions in Python's numpy module) on that time chunk of time. These chunks contain 1024 frames, and with a frame rate of 44100 frames per second, means that these time chunks are about 20 milliseconds. These frequency buckets are created for each time chunk in the song at the beginning of the Python script when a song is chosen.
The song plays by first applying an inverse FFT onto a frequency bucket, which returns the time-domain representation of that time chunk. Then, the script will go frame-by-frame in the output time chunk from the inverse FFT, configure the bits for the DAC, and output them to the DAC using SPI. This will reverse for each frequency bucket that was created at the beginning of the script. In order to manipulate the sounds of the audio output, the frequency buckets are modulated before the inverse FFT is applied. The audio manipulation is done by multiplying the frequency bucket with an array of the same size. This multiplication is element-wise, so the array that the frequency bucket will be multiplied by represents an array of scalars that will either increase or decrease the values at a given frequency. For example, cutting out the high frequencies requires a scalar array that is 1's for all frequencies lower than 4000 Hz and 0's for frequencies above 4000 Hz. In this way, the high-frequency range is removed from the frequency bucket, but the magnitudes of the other frequencies stay the same. Additionally, the frequencies can be multiplied by fractions in order to decrease the frequency ranges, but not completely cut them out. The scalars for each frequency are determined by the values that the interface reads, which is discussed later in the GUI section.
One of the first issues that we came across during the development of this project was in outputting audio through the digital to analog converter(DAC). Before we modulated any of the frequency information from the song, we first wanted to see if we could load the song correctly from the wave file and output this time domain information through GPIO pins to the DAC. We started out with a single song to see what would happen if this was played, and were met with overwhelming static and overall lack of clarity of the music. It was impossible to tell what kind of modulation was occurring to the song we were playing because of the frequency complexity of the song. To remedy this, we changed the audio file we were playing to that of an A440 note, which visually looks like a sine wave. By playing this, we were able to scope the output of the DAC to analyze what transformation the frequencies were going through. Below is an image of what the output looked like on the oscilloscope.
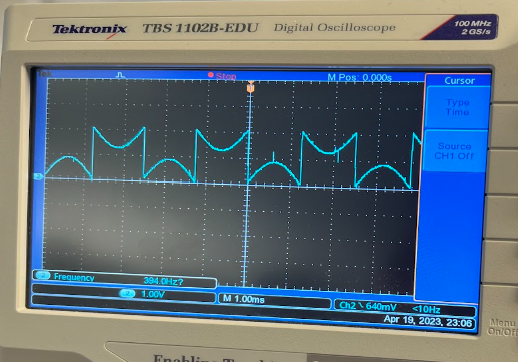
After further analysis, we discovered the issue was with the data type that we were using to output to the DAC. Because the input was a sign wave, it had both positive and negative components. Because we knew the DAC only accepted positive values, we used a signed integer. The problem with this was that the negative values were being wrapped to the top of the data spectrum creating weird jumps when the values crossed the 'zero' mark. To remedy this, we changed the type to a signed integer, found the maximum value the DAC could accept, 4096, and shifted all of the data up by half of this amount. This remedied our static issue and made the audio sound much more clear, even after shifting back to a full song.
Another issue that we faced was a slight static sound that was persistently heard over the speakers whether a song was playing or not. Initially, we thought this was an issue with just low frequency leaking from the Raspberry Pi causing there to be a slight buzz on the audio output. In order to address this problem, we implemented a series of low pass and band pass filters to try to cut out low and high frequencies. Unfortunately, no matter how narrow of a band we allowed to pass to the audio output, the buzz did not resolve itself. Finally, we attempted to rewire the entire circuit, this time using shortened hand-cut wires instead of the provided lab wires. This greatly diminished the length of the wires overall and separated them spatially on the board. After rewiring the circuit, the buzz went completely away, meaning that it was likely because of the length of the wires or some interference between them as they wrapped around one another on the board.
The testing for the actual audio processing was based on how the sound was heard coming from the speakers. The decision to process the audio bytes into their FFTs at the beginning of the script came with the trade-off of adding a long loading delay at the beginning of the script. However, without this long loading time, the FFTs would have needed to be made while also outputting the sound bytes to the DAC. This method, however, took too much time to create an FFT and do the inverse on the transform, and even without any audio frequency manipulation, the sound from the speakers was slowed down too much and incomprehensible. So, allowing the FFTs to be processed at the beginning of the scripts and taking their inverses during the playback was much better, and even sped up the audio during playback. This playback was kept at this slightly faster rate in order to compensate for further timing issues that may come up during further development.
One auditory issue that we had run into while doing audio manipulation occurred whenever any portion of the frequency bucket was multiplied, but the audio effect of this calculation was most notable when multiplying the entire frequency bucket, which effectively changes the volume. At these points, there was a light bumping sound coming from the speaker, similar to the noise that occurs when plugging a speaker into an audio plug. This issue was a result of the DC offset that we introduce (the data shifted upwards to mitigate static). Initially, this +2048 shift was done before any spectrum manipulation. This caused the DC shift to change when multiplying in the frequency domain, thus causing a discontinuity in the time domain and causing that low-frequency bump in the sound. To change this, the +2048 shift was introduced at the very end of the processing, so that no further frequency manipulation was performed on the frequency buckets.
Graphical User Interface
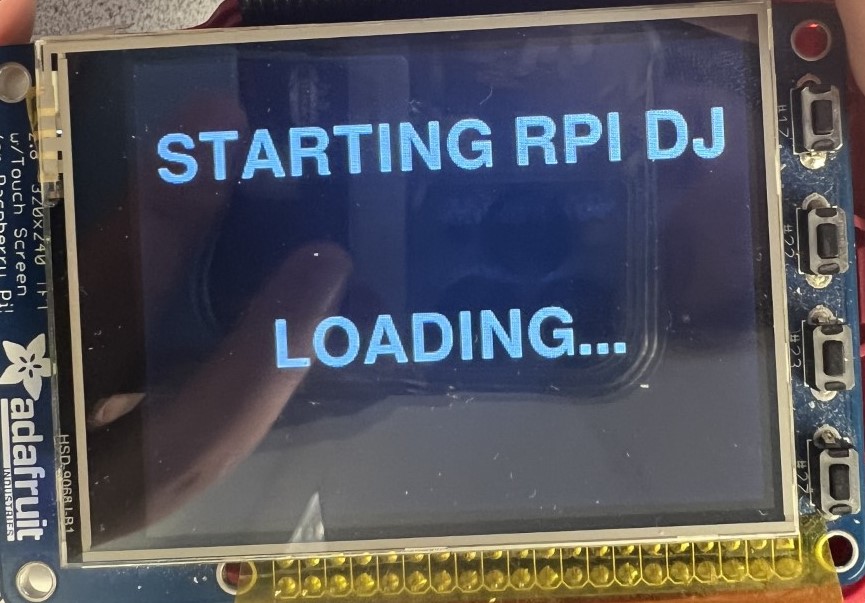
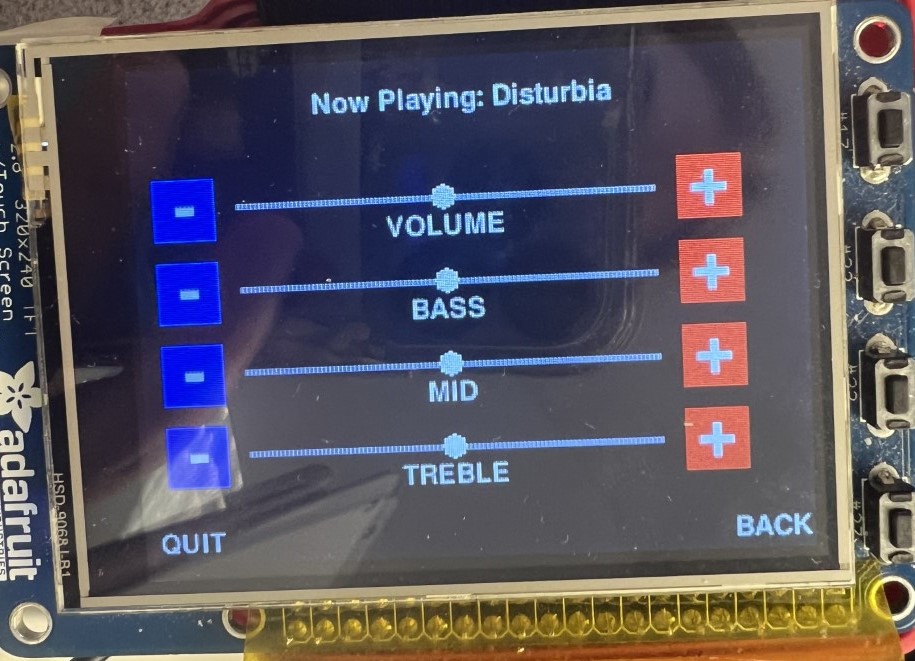
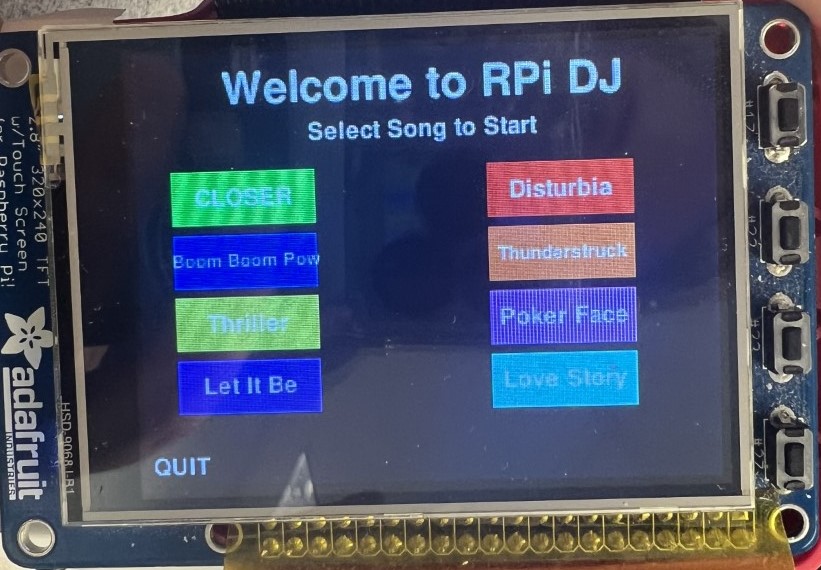
One thing that we wanted to make sure to implement in our final design was a Graphical User Interface that the user could interact with to control the program. To do this, we decided to use Pygame, a python library meant for user facing game design. The first stage of the user interface is the welcome screen. This screen introduces the game and instructs the user to "Select a Song to Start". Below this message are eight colored rectangles, each labeled with a different song name. The user is then able to tap on the song they would like to hear. From this point, another page is brought up, a loading screen telling the user that their given song choice is loading. After the loading is complete, a final screen appears. This final screen first lists the song that is playing at the top. This is followed by four bars with circular markers and buttons at either end. By tapping the buttons on either end of the bars, the user can raise or lower the volume, bass, mid, and treble levels. When the plus or minus buttons are pressed, the circular markers on the bar move in correspondence with the level selected. In the bottom right hand corner there is a 'Back' button which allows the user to go back to the main screen to select a different song to play. In the right hand corner of the first and the last screen is a 'Quit' button, which exits the program completely when selected.
In order to minimize the processing power needed to operate the GUI, we implemented some dependencies on the loop. The first thing we did was blocked the tracking of all of the events, then enabled only MOUSEBUTTONUP, or when a click was lifted. This allowed us to only keep track of mouse clicks so that the loop would only be run in that scenario. We then used the event wait command to pause at the top of the loop until a MOUSEBUTTONUP event entered the event queue. When this occurred, that is when the location would be checked to see which button was pressed and perform the appropriate actions. Additionally, the correct screen would be displayed on the screen and variables would be updated appropriately for correct display. Setting up the event loop this way allowed for diminished processing power to be allocated to the GUI so that more could be focused on the audio playback.
This code also used two queues to communicate with the preprocessing audio thread. The first queue was 'p' which was used exclusively to read from. Mainly this queue was used to read the 'Ready' flag to determine when the preprocessing of a song was complete and ready for audio playback. This would advance the screen to the correct stage from the loading page to the page with the audio controls visible. The other queue that was used by this program was 'q'. This queue was used exclusively to write in to, communicating the audio controls back to the preprocessing code. The first item written into this queue was the song choice, which communicated which song the user selected from the main menu. After this, the volume, bass, mid, and treble values would be loaded into the queue when the level was updated, first appending the corresponding indicator ('v', 'b', 'm', 't') to the front to signify which level had been adjusted. Finally, when the quit button was pressed, a 'Quit' command was loaded into the queue as well, signaling the preprocessing code to also quit so that the entire program exited together. This communication protocol avoided all data race situations by signifying one queue to read from and one to write to for each program. This allowed for us to have reliable data transfer between the two programs.
During the development of the graphical user interface, there was a series of tests that were done to make sure the display was working correctly. The first thing that was implemented was a quit button, which exited the program completely back to the main screen. Because of the structure of pygame, a simple control-C command will not exit the code completely. Thus for adequate testing, a quit button is the only way to ensure the program can be run multiple times in a row without power cycling the Raspberry Pi. After this was implemented, the GUI design was a series of repeated tests by running the program. Because all of the locations of rectangles and words are pixel based, it is difficult to get the location correct on the screen by estimating. Instead, the program must be rerun with adjusted locations until the interface looks as the designer wants. Unfortunately while there are mathematical ways to ensure correct placement, the only way to guarantee is to rerun the code, testing the placement of every item.
While we were testing the capabilities of our project on our own, we usually stuck to playing the beginning of a song only, pressing the back button before the song ended. While this is fine for short demonstrations, it creates problems when the user actually wants to listen to the entire song play all the way through. We noticed that when the song would play all the way through, the second song would not load properly or start playing. To fix this problem, we added in another loop at the end of the preprocessing loop that made the program wait for the back button to be pressed to exit back to the main screen before restarting the loop. Without this loop, the program would restart and collect the command 'Back' from the queue when trying to find the song name, and get stuck. Luckily, this was a fairly easy fix that was able to be made with little to no other code modification.
Threads
Because of the sheer amount of processing that needed to be carried out before the audio could be played, we decided to implement threads in order to split the processing across cores. To do this we designed a threads script using the multiprocessing python library. First,the queues were constructed. Because they are shared data structures, they need to be defined in this shared file. To do this, first the context was collected, and then the queue was defined in reference to this context. Next, the processes were defined, the first being the main function of the interface code, including the arguments q and p for the queues. The second process was then defined as the main function of the audio preprocessing code, including the same arguments as before. The threads were then each started and then joined. This code was fairly simple in nature, but allowed for our overall product to come together cohesively as we could run both programs simultaneously with our limited processing power.
Another major issue that we came across was after writing and implementing all of the code using the multiprocessing library. Because of the processing power needed to perform the FFTs on the audio as well as run and update the GUI dynamically, it was best to run the code as threads on two different cores. At first, we tested each of the code modules independently of the threads file, ensuring that they functioned separately. After passing this test, we moved on to testing the threads on the screen connected to the Raspberry Pi through HDMI. The program worked exactly as expected, proving that the threads were implemented correctly and both of the code modules were implemented correctly. The issue came when trying to run the threads code on the piTFT. Despite working in all the previous instances, even independently on the piTFT, when the code was run on the piTFT using threads, the GUI would not exit. After reading through the code line by line, analyzing the different quit mechanisms employed by all of the different exit strategies, we realized the issue. When the quit button was pressed on the piTFT, the pygame.exit() command was not issued, meaning that the code never exited pygame and thus never exited the GUI. We are still not sure why this problem was only apparent when running the code using threads and not independently, but when this line was added, the code began exiting properly, remedying the error.
While we faced a series of complex issues during the development of this project, we were able to solve each of them, turning them into learning experiences along the way. Our testing strategy was overall very detail oriented and made sure to pinpoint the source of the problem in the most efficient way, using all of the tools that the lab provided. The functionality of our project is solely because of our developed debugging skills.
Results
Despite having very loft goals at the beginning of this project, we were able to achieve everything that we set out to do. We wanted to be able to modulate the volume, bass, mid, and treble frequency spectra of a song which we are able to do. The one limiting factor that this project has is the number of songs that we were able to have as options for the user to select. Because of the storage capacity of the Raspberry Pi and the display size of the TFT, we had to limit the number of available songs to eight. While this is still quite a few, it is not, in reality, what a DJ would experience. Another expectation that we were not able to meet was the use of slide bars to track the level of the adjustable variables. We wanted to only track certain events within the pygame spectrum of events in order to minimize processing power. In order to have slide bars, we would have had to track mouse movement as well as clicking, which slowed down the song processing significantly. As a concession to get the final project in its best form, we decided to scrap the idea of slide bars and only implement buttons to raise and lower the levels. Overall, our team met all of the major project goals that we set for ourselves and are proud of the final product that we developed.
Conclusions
The RPi DJ project is a complex DJ system that allows the user to choose a song to listen to and then control the audio playback in real time. By boosting the bass, mid, and treble frequency levels of the audio, the user gets a fully customizable audio experience to enjoy. The user can control the audio playback by tapping on the piTFT screen over the plus and minus buttons to move the levels as the song plays. Because of the real-time aspect of the program, the user is able to adjust their experience as the audio plays providing for the most flexible design. Whenever we ran across a major issue within the project, the team was able to work well together to remedy the issue in the most timely way possible. Overall this project was a success and we are excited to have produced such a robust final deliverable.
Future Work
If there was more time to work on this project, the first thing that we would explore would be the implementation of a pause and play button. Currently, once a song is started, it can only be stopped by hitting the 'BACK' button. Hitting this button returns the user to the main screen and will only continue to play music if a song is chosen again. The implementation of a pause and play button would allow the user to stop the processing of the buckets in the preprocessing_queue.py thread and then restart the song at the same point as before by clicking the same button.
Another function that we would explore in this project would be slide bars for the controls of the audio. After demonstrating our project to many different people during the robotics fair, it was clear that their instinct was to slide the bar, not press the buttons on the screen. It would be possible to implement slide bar functionality, but it could hinder the playback of the song as pygame would have to track mouse movement across the screen instead of just mouse clicks. While it is doable, it might require further optimization of the code.
If given more time,we also would have explored skipping ahead and rewinding of a song. Because all of the preprocessing of the song is done beforehand, it would be theoretically possible to have some sort of pointer which kept track of progress of the song. By using rewind and fastforward buttons, the user could move ahead or go back in the song by a prespecified amount. The only issue with this could be that it would slow down the processing of the song because there is more to keep track of during the processing.
Finally, if given enough time we would explore the possibility of preprocessing the songs into FFTs before loading the song. Currently, the code functions by reading from a queue to select the correct song to open and then opening the song. The song is then broken down and converted into the frequency domain in order to increase or decrease the magnitudes of certain frequencies. It is possible to do this processing ahead of time for all of time and store all of the songs as their FFT'd versions. This would eliminate the process loading time and likely speed up the entire program. By the time we realized that this was a possibility it was the end of the semester so we did not want to attempt any major changes.
Work Distribution
RPi DJ Project Group
Jacob Tamor
jwt95@cornell.edu
Designed audio playback system and optimized processing.

Rosie Wildermuth
rjw252@cornell.edu
Made the Graphical User Interface and implemented threading with queues.
Parts List
- Raspberry PI: $35
- PiTFT: $22.79
- Digital to Analog Converter (MCP4822): $3.97 (Provided in Lab)
- Audio Jack: $4.83 (Provided in Lab)
- Speakers: $15 Provided in Lab
- Wires: Provided in lab
Total: $81.59
References
MCP4822 DatasheetAudacity Music Software
Pygame Resource
Wav Library
Mulitprocessing Library
Numpy FFT Function
Spidev Library
Code Appendix
This code can also be found on Github here.
threads_queue.py
                import interface_queue, preprocessing_queue
                import multiprocessing as mp
                import sys
                import time
                from multiprocessing import Process, Queue, Value, Lock, Array

                """
                Rosie Wildermuth (rjw252) and Jacob Tamor (jwt95)
                Final Project: RPi DJ
                04/11/2023
                Thread code that runs both interface_queue and preprocessing_queue simultaneously
                and instantiates their shared queues. Run this code to run the entire system.
                """

                if __name__ == '__main__':

                  # Create Queues
                  ctx = mp.get_context('spawn')
                  q = ctx.Queue()
                  p = ctx.Queue()

                  # Create Processes
                  p0 = Process(target=interface_queue.main, args=(q,p))
                  p1 = Process(target=preprocessing_queue.main, args=(q,p))

                  # Start Processes
                  p0.start()
                  p1.start()

                  # Join Processes
                  p1.join()
                  p0.join()

                  sys.exit()
preprocessing_queue.py
          import wave
          import numpy as np
          from numpy import fft
          import spidev
          import struct
          import time
          import loading
          import sys
          import multiprocessing as mp

          """
          Rosie Wildermuth (rjw252) and Jacob Tamor (jwt95)
          Final Project: RPi DJ
          04/11/2023
          This code runs all of the audio preprocessing for the songs. It waits for
          input from the shared queues it has with the interface code, then loads
          the appropriate song, performs the FFT, mutates the song according to user
          input, reverses the FFT, and then outputs the song through SPI to the DAC.
          When the song ends, it waits for the user to exit back to the main screen
          before rerunning the loop and waiting for a new song selection.
          """

          # User Control Variables
          v = 50
          b = 50
          m = 50
          t = 50

          def main(q,p):	# Preprocessing Main Function
            global v, b, m, t
            while not q.empty():	# Wait for a song selection
              q.get()
            # ~ print(q.get())
            get = ''
            try:
              song_name = None
              while song_name is None: # Get Sone input from queue
                song_name = q.get()
              song = None
              while song is None: # Quit or open the correct song accorind to queue output
                if song_name == 'Quit':
                  sys.exit()
                elif song_name == 'Closer':
                  song = wave.open("closer.wav", 'rb')
                elif song_name == 'Disturbia':
                  song = wave.open("disturbia.wav", 'rb')
                elif song_name == 'Boom':
                  song = wave.open("boomboompow.wav", 'rb')
                elif song_name == 'Thunderstruck':
                  song = wave.open("thunderstruck.wav", 'rb')
                elif song_name == 'Thriller':
                  song = wave.open("thriller.wav", 'rb')
                elif song_name == 'Poker':
                  song = wave.open("pokerface.wav", 'rb')
                elif song_name == 'Let':
                  song = wave.open("letitbe.wav", 'rb')
                elif song_name =='Love':
                  song = wave.open("lovestory.wav", 'rb')

              n = 1024 # bucket frame length
              framerate = song.getframerate()
              timestep = 1./framerate
              freqs = np.fft.rfftfreq(n, d=timestep)

              LOW_STATIC_RANGE = 1

              # filter below 20 Hz
              below_20 = np.asarray([1 if f > 20 else 0 for f in freqs])
              above_20000 = np.asarray([1 if f < 17000 else 0 for f in freqs])
              audio_band = above_20000

              # Low Frequency Band
              low_pass = np.asarray([1 if (LOW_STATIC_RANGE < f and f < 300) else 0 for f in freqs]) / 100
              low_pass_inv = np.asarray([0 if (LOW_STATIC_RANGE < f and f < 300) else 1 for f in freqs])

              # Mid Frequency Band
              mid_pass = np.asarray([1 if (300 <= f and f <= 4000) else 0 for f in freqs]) / 100
              mid_pass_inv = np.asarray([0 if (300 <= f and f <= 4000) else 1 for f in freqs])

              # High Frequency Band
              high_pass = np.asarray([1 if f > 4000 else 0 for f in freqs]) / 100
              high_pass_inv = np.asarray([0 if f > 4000 else 1 for f in freqs])

              # Run modulation
              def modulate(low_percent, mid_percent, high_percent):
                return (low_percent * low_pass + low_pass_inv) * (mid_percent * mid_pass + mid_pass_inv) * (high_percent * high_pass + high_pass_inv)

              # Unpack Frames
              def unpack(frame):
                res = int.from_bytes(frame, 'little', signed = True) >> 4
                return res

              # Chunk Frames
              def chunk_frames(frame_array, length):
                return [frame_array[i:i+length] for i in range(0, len(frame_array),length)]

              # Perform FFT
              def process_fft(chunk):
                return fft.rfftn(chunk)

              # Make Song Buckets
              def make_buckets(song):
                song_bytes = song.readframes(song.getnframes())
                frame_list = [unpack(song_bytes[i:i+2]) for i in range(0, len(song_bytes),2)]
                buckets = [process_fft(chunk) for chunk in chunk_frames(frame_list, n)]
                return buckets[:-1]

              # Change Volume
              def change_volume(bucket, percent):
                return bucket * (percent / 100)

              # Proess Audio
              def process(bucket):
                return fft.irfft(bucket) + 2048

              back_flag = False

              # Set up SPI
              spi = spidev.SpiDev()
              spi.open(1,0)
              spi.max_speed_hz = 3000000
              buckets = make_buckets(song)
              print("Starting...")
              p.put('Ready')
              for i, bucket in enumerate(buckets): # Collect User Variables from Queue
                if not q.empty():
                  get = q.get()
                  # ~ print(get)
                  if get == 'back':
                    back_flag = True
                    break
                  elif get == 'Quit':
                    sys.exit()
                  elif get[0] == 'v':
                    v = int(get[1:])
                  elif get[0] == 'b':
                    b = int(get[1:])
                  elif get[0] == 'm':
                    m = int(get[1:])
                  elif get[0] == 't':
                    t = int(get[1:])
                processed = process(change_volume(bucket * modulate(b,m,t), v))
                for frame in processed: 	# Output Bucket
                  # ~ print("Writing...")
                  output = 0x3000 | int(frame)
                  output_bytes = (output).to_bytes(2, 'big', signed=True)
                  spi.writebytes(output_bytes)
              song.close()

              print(back_flag)
              while not back_flag: # Wait for Back button after song ends
                get = q.get()
                if get == 'back':
                  print(get =='back')
                  back_flag = True
              spi.close()
              main(q,p) # Re-enter the loop
            except KeyboardInterrupt:
              song.close()
              spi.close()

          if __name__ == '__main__':
              main(q,p)
interface_queue.py
import pygame
import os
import signal
import RPi.GPIO as GPIO
import time
import random
import wave
import sys
from pygame.locals import *
import multiprocessing as mp
"""
Rosie Wildermuth (rjw252) and Jacob Tamor (jwt95)
Final Project: RPi DJ
04/11/2023
This code runs the GUI for the RPi DJ project. It initializes to a main menu
screen that has 8 song option buttons to choose from. When a song is chosen,
the screen changes to a loading screen that waits for a signal to advance to
the song control page. When that page is brought up, the user can control the
audio playback of a song by pressing buttons on their side of four bars.
All communication and control is done through shared queues with the preprocessing
code.
"""
def main(q,p): # Main Function of interface_queue
quit_flag = False
def GPIO_callback(channel): # piTFT Button Quit
global quit_flag
GPIO.cleanup()
quit_flag = True
pins = [4,26,17,22,23,27]
GPIO.setmode(GPIO.BCM)
GPIO.setup(pins, GPIO.IN, pull_up_down=GPIO.PUD_UP)
for pin in pins: # Setup GPIO event for quit
GPIO.add_event_detect(pin, GPIO.FALLING, callback=GPIO_callback)
# Set up for piTFT
os.putenv('SDL_VIDEODRIVER','fbcon')
os.putenv('SDL_FBDEV','/dev/fb1')
os.putenv('SDL_MOUSEDRV','TSLIB')
os.putenv('SDL_MOUSEDEV','/dev/input/touchscreen')
pygame.init()
fps = 48
clock = pygame.time.Clock()
pygame.mouse.set_visible(False)
size = width, height = 320, 240
speed = [2,2]
speed2 = [1, 1]
white = 255, 255, 255
black = 0, 0, 0
screen = pygame.display.set_mode(size)
font_default = pygame.font.Font(None, 20)
font_small = pygame.font.Font(None, 15)
font_mid = pygame.font.Font(None, 35)
font_big = pygame.font.Font(None, 50)
screen.fill(black)
# Draw initial main menu rectangles
pygame.draw.rect(screen, (0,255,0), pygame.Rect(20, 65, 80, 30)) # closer rectangle
pygame.draw.rect(screen, (255,0,0), pygame.Rect(195, 65, 80, 30)) # A440 rectangle
pygame.draw.rect(screen, (0,0,255), pygame.Rect(20, 100, 80, 30)) # Song 3 rectangle
pygame.draw.rect(screen,(255,100,0), pygame.Rect(195, 100, 80, 30)) # Song 4 rectangle
pygame.draw.rect(screen,(230,240,10), pygame.Rect(20, 135, 80, 30)) # Song 5 rectangle
pygame.draw.rect(screen,(200,80,200), pygame.Rect(195, 135, 80, 30)) # Song 6 rectangle
pygame.draw.rect(screen,(130,10,245), pygame.Rect(20, 170, 80, 30)) # Song 7 rectangle
pygame.draw.rect(screen,(10,240,240), pygame.Rect(195, 170, 80, 30)) # Song 8 rectangle
# initializing text boxes and ball images
quit_surface = font_default.render('QUIT', True, white)
quit_rect = quit_surface.get_rect(center=(20, 230))
screen.blit(quit_surface, quit_rect)
back_surface = font_default.render('BACK', True, white)
back_rect = back_surface.get_rect(center=(300, 230))
song1_surface = font_default.render('CLOSER', True, white)
song1_rect = song1_surface.get_rect(center=(60, 80))
screen.blit(song1_surface, song1_rect)
song2_surface = font_default.render('Disturbia', True, white)
song2_rect = song2_surface.get_rect(center=(235, 80))
screen.blit(song2_surface, song2_rect)
song3_surface = font_small.render('Boom Boom Pow', True, white)
song3_rect = song3_surface.get_rect(center=(60, 115))
screen.blit(song3_surface, song3_rect)
song4_surface = font_small.render('Thunderstruck', True, white)
song4_rect = song4_surface.get_rect(center=(235, 115))
screen.blit(song4_surface, song4_rect)
song5_surface = font_default.render('Thriller', True, white)
song5_rect = song5_surface.get_rect(center=(60, 150))
screen.blit(song5_surface, song5_rect)
song6_surface = font_default.render('Poker Face', True, white)
song6_rect = song6_surface.get_rect(center=(235, 150))
screen.blit(song6_surface, song6_rect)
song7_surface = font_default.render('Let It Be', True, white)
song7_rect = song7_surface.get_rect(center=(60, 185))
screen.blit(song7_surface, song7_rect)
song8_surface = font_default.render('Love Story', True, white)
song8_rect = song8_surface.get_rect(center=(235, 185))
screen.blit(song8_surface, song8_rect)
song1playing_surface = font_default.render('Now Playing: Closer', True, white)
song1playing_rect = song1playing_surface.get_rect(center=(160, 20))
song2playing_surface = font_default.render('Now Playing: Disturbia', True, white)
song2playing_rect = song2playing_surface.get_rect(center=(160, 20))
song3playing_surface = font_default.render('Now Playing: Boom Boom Pow', True, white)
song3playing_rect = song3playing_surface.get_rect(center=(160,20))
song4playing_surface = font_default.render('Now Playing: Thunderstruck', True, white)
song4playing_rect = song4playing_surface.get_rect(center=(160,20))
song5playing_surface = font_default.render('Now Playing: Thriller', True, white)
song5playing_rect = song5playing_surface.get_rect(center=(160,20))
song6playing_surface = font_default.render('Now Playing: Poker Face', True, white)
song6playing_rect = song6playing_surface.get_rect(center=(160,20))
song7playing_surface = font_default.render('Now Playing: Let It Be', True, white)
song7playing_rect = song7playing_surface.get_rect(center=(160,20))
song8playing_surface = font_default.render('Now Playing: Love Story', True, white)
song8playing_rect = song8playing_surface.get_rect(center=(160,20))
songstart_surface = font_default.render('Select Song to Start', True, white)
songstart_rect = songstart_surface.get_rect(center=(160, 45))
screen.blit(songstart_surface, songstart_rect)
volumemin_surface = font_big.render('-', True, white)
volumemin_rect = volumemin_surface.get_rect(center=(25,66))
volumemax_surface = font_big.render('+', True, white)
volumemax_rect = volumemax_surface.get_rect(center =(275, 64))
volume_surface = font_default.render('VOLUME', True, white)
volume_rect = volume_surface.get_rect(center=(150, 80))
bassmin_surface = font_big.render('-', True, white)
bassmin_rect = bassmin_surface.get_rect(center=(25,106))
bassmax_surface = font_big.render('+', True, white)
bassmax_rect = bassmax_surface.get_rect(center =(275, 104))
bass_surface = font_default.render('BASS', True, white)
bass_rect = bass_surface.get_rect(center=(150, 120))
midmin_surface = font_big.render('-', True, white)
midmin_rect = midmin_surface.get_rect(center=(25,146))
midmax_surface = font_big.render('+', True, white)
midmax_rect = midmax_surface.get_rect(center=(275, 144))
mid_surface = font_default.render('MID', True, white)
mid_rect = mid_surface.get_rect(center=(150, 160))
treblemin_surface = font_big.render('-', True, white)
treblemin_rect = treblemin_surface.get_rect(center=(25, 186))
treblemax_surface = font_big.render('+', True, white)
treblemax_rect = treblemax_surface.get_rect(center =(275,184))
treble_surface = font_default.render('TREBLE', True, white)
treble_rect = treble_surface.get_rect(center=(150,200))
rpidj_surface = font_big.render('STARTING RPI DJ', True, white)
rpidj_rect = rpidj_surface.get_rect(center=(160, 50))
loading_surface = font_big.render('LOADING...', True, white)
loading_rect = loading_surface.get_rect(center=(160, 150))
welcome_surface = font_mid.render('Welcome to RPi DJ', True, white)
welcome_rect = welcome_surface.get_rect(center=(160, 20))
screen.blit(welcome_surface, welcome_rect)
# Initialize song select flags
song1_flag = False
song2_flag = False
song3_flag = False
song4_flag = False
song5_flag = False
song6_flag = False
song7_flag = False
song8_flag = False
paused_flag = False
ready_flag = False
start_flag = True
# Initialize counters
volume_counter = 50
bass_counter = 50
treble_counter = 50
mid_counter = 50
pygame.display.flip()
pygame.event.set_blocked(None)
pygame.event.set_allowed(MOUSEBUTTONUP)
start_time = time.clock_gettime(time.CLOCK_MONOTONIC)
while (True):
# ~ time.sleep(0.005)
clock.tick(fps)
pygame.event.wait()
pos = pygame.mouse.get_pos()
coordinates = pos
x,y = pos
# compatibilty for all button squares
if start_flag:
if x > 50 and x < 70 and y > 70 and y < 90: # Closer Selected
q.put('Closer')
song1_flag = True
start_flag = False
elif x > 225 and x < 245 and y > 70 and y < 90: # A440 Selected
q.put('Disturbia')
song2_flag = True
start_flag = False
elif x > 50 and x < 70 and y > 105 and y < 125: # Boom Boom Pow selected
q.put('Boom')
song3_flag = True
start_flag = False
elif x > 225 and x < 245 and y > 105 and y < 125: # Thunderstruck selected
q.put('Thunderstruck')
song4_flag = True
start_flag = False
elif x > 50 and x < 70 and y > 140 and y < 160: # Thriller selected
q.put('Thriller')
song5_flag = True
start_flag = False
elif x > 225 and x < 245 and y > 140 and y < 160: # Poker Face selected
q.put('Poker')
song6_flag = True
start_flag = False
elif x > 50 and x < 70 and y > 175 and y < 195: # Let It Be selected
q.put('Let')
song7_flag = True
start_flag = False
elif x > 225 and x < 245 and y > 175 and y < 195: # Love Story selected
q.put('Love')
song8_flag = True
start_flag = False
else:
if ready_flag:
if x > 285 and y > 210: # Back to start screen
q.put('back')
start_flag = True
song1_flag = False
song2_flag = False
song3_flag = False
song4_flag = False
song5_flag = False
song6_flag = False
song7_flag = False
song8_flag = False
ready_flag = False
elif x > 10 and x < 40 and y > 50 and y < 80 and volume_counter > 0: # lower volume
volume_counter = volume_counter - 10
q.put('v'+ str(volume_counter))
# run volume code
elif x > 260 and x < 290 and y > 50 and y < 80 and volume_counter < 100: # raise volume
volume_counter = volume_counter + 10
q.put('v'+ str(volume_counter))
# run volume code
elif x > 10 and x < 40 and y > 90 and y < 120 and bass_counter > 0: # lower bass
bass_counter = bass_counter - 10
q.put('b'+ str(bass_counter))
# run bass code
elif x > 260 and x < 290 and y > 90 and y < 120 and bass_counter < 100: # raise bass
bass_counter = bass_counter + 10
q.put('b'+ str(bass_counter))
# run bass code
elif x > 10 and x < 40 and y > 130 and y < 160 and mid_counter > 0: # lower mid
mid_counter = mid_counter - 10
q.put('m'+ str(mid_counter))
# run mid code
elif x > 260 and x < 290 and y > 130 and y < 160 and mid_counter < 100: # rasie mid
mid_counter = mid_counter + 10
q.put('m'+ str(mid_counter))
# run mid code
elif x > 10 and x < 40 and y > 170 and y < 200 and treble_counter > 0: # lower treble
treble_counter = treble_counter - 10
q.put('t'+ str(treble_counter))
# run treble code
elif x > 260 and x < 290 and y > 170 and y < 200 and treble_counter < 100: #raise treble
treble_counter = treble_counter + 10
q.put('t'+ str(treble_counter))
# run treble code
if x < 40 and y > 210: # Quit Button Pressed
q.put('Quit')
pygame.quit()
GPIO.cleanup()
sys.exit()
quit()
screen.fill(black)
# flags for different conditions
if not start_flag:
if ready_flag: # allow for animations and go to Playback Screen
screen.blit(back_surface, back_rect)
screen.blit(quit_surface, quit_rect)
# Volume Display
pygame.draw.rect(screen, (150,150,150), pygame.Rect(50, 65, 200, 3)) # volume bar
pygame.draw.rect(screen, (0,0,255), pygame.Rect(10, 52, 30, 30)) # volume minus
screen.blit(volumemin_surface, volumemin_rect)
pygame.draw.rect(screen, (255,0,0), pygame.Rect(260, 52, 30, 30)) # volume plus
screen.blit(volumemax_surface, volumemax_rect)
screen.blit(volume_surface, volume_rect)
# Bass Display
pygame.draw.rect(screen, (150,150,150), pygame.Rect(50, 105, 200, 3)) # bass bar
pygame.draw.rect(screen, (0,0,255), pygame.Rect(10, 92, 30, 30)) # bass minus
screen.blit(bassmin_surface, bassmin_rect)
pygame.draw.rect(screen, (255,0,0), pygame.Rect(260, 92, 30, 30)) # bass plus
screen.blit(bassmax_surface, bassmax_rect)
screen.blit(bass_surface, bass_rect)
# Mid Display
pygame.draw.rect(screen, (150,150,150), pygame.Rect(50, 145, 200, 3)) # mid bar
pygame.draw.rect(screen, (0,0,255), pygame.Rect(10, 132, 30, 30)) # mid minus
screen.blit(midmin_surface, midmin_rect)
pygame.draw.rect(screen, (255,0,0), pygame.Rect(260, 132, 30, 30)) # mid plus
screen.blit(midmax_surface, midmax_rect)
screen.blit(mid_surface, mid_rect)
# Treble Display
pygame.draw.rect(screen, (150,150,150), pygame.Rect(50, 185, 200, 3)) # treble bar
pygame.draw.rect(screen, (0,0,255), pygame.Rect(10, 172, 30, 30)) # treble minus
screen.blit(treblemin_surface, treblemin_rect)
pygame.draw.rect(screen, (255,0,0), pygame.Rect(260, 172, 30, 30)) # treble plus
screen.blit(treblemax_surface, treblemax_rect)
screen.blit(treble_surface, treble_rect)
# Level Displays
pygame.draw.circle(screen, (255,255,255), (50 + volume_counter*2, 66), 6) # volume tracker
pygame.draw.circle(screen, (255,255,255), (50 + bass_counter*2, 106), 6) # bass tracker
pygame.draw.circle(screen, (255,255,255), (50 + mid_counter*2, 146), 6) # mid tracker
pygame.draw.circle(screen, (255,255,255), (50 + treble_counter*2, 186), 6) #treble tracker
elif not ready_flag: # Loading Screen
screen.blit(rpidj_surface, rpidj_rect)
screen.blit(loading_surface, loading_rect)
else: # startup screen
screen.blit(quit_surface, quit_rect)
pygame.draw.rect(screen, (0,255,0), pygame.Rect(20, 65, 80, 30)) # closer rectangle
pygame.draw.rect(screen, (255,0,0), pygame.Rect(195, 65, 80, 30)) # A440 rectangle
pygame.draw.rect(screen, (0,0,255), pygame.Rect(20, 100, 80, 30)) # Song 3 rectangle
pygame.draw.rect(screen,(255,100,0), pygame.Rect(195, 100, 80, 30)) # Song 4 rectangle
pygame.draw.rect(screen,(230,240,10), pygame.Rect(20, 135, 80, 30)) # Song 5 rectangle
pygame.draw.rect(screen,(200,80,200), pygame.Rect(195, 135, 80, 30)) # Song 6 rectangle
pygame.draw.rect(screen,(130,10,245), pygame.Rect(20, 170, 80, 30)) # Song 7 rectangle
pygame.draw.rect(screen,(10,240,240), pygame.Rect(195, 170, 80, 30)) # Song 8 rectangle
screen.blit(song1_surface, song1_rect)
screen.blit(song2_surface, song2_rect)
screen.blit(song3_surface, song3_rect)
screen.blit(song4_surface, song4_rect)
screen.blit(song5_surface, song5_rect)
screen.blit(song6_surface, song6_rect)
screen.blit(song7_surface, song7_rect)
screen.blit(song8_surface, song8_rect)
screen.blit(songstart_surface, songstart_rect)
screen.blit(welcome_surface, welcome_rect)
if ready_flag: # Display what song is playing
if song1_flag:
screen.blit(song1playing_surface, song1playing_rect)
if song2_flag:
screen.blit(song2playing_surface, song2playing_rect)
if song3_flag:
screen.blit(song3playing_surface, song3playing_rect)
if song4_flag:
screen.blit(song4playing_surface, song4playing_rect)
if song5_flag:
screen.blit(song5playing_surface, song5playing_rect)
if song6_flag:
screen.blit(song6playing_surface, song6playing_rect)
if song7_flag:
screen.blit(song7playing_surface, song7playing_rect)
if song8_flag:
screen.blit(song8playing_surface, song8playing_rect)
pygame.display.flip()
if not start_flag and not ready_flag: # Wait for ready to advance from Load Screen
read = ''
read = p.get()
pygame.event.post(pygame.event.Event(MOUSEBUTTONUP))
if read == 'Ready':
ready_flag = True
read = ''
if quit_flag:
# ~ time.sleep(1)
pygame.quit()
sys.exit()
if __name__ == '__main__':
main(q,p)